A New Era in the Terminal
After years using bash, I decided to embrace a simple yet powerful change: adopting Z Shell (zsh). What started as a curiosity during a conversation with a colleague turned into a pivotal shift in how I use the terminal. In 2011, it was still common to see most developers stuck with bash, which—while robust—revealed its limitations in more intense use cases.
Bash, short for Bourne Again SHell, is the default in many Linux distributions and was also bundled with macOS. Although it offers great portability and compatibility with legacy scripts, its daily usage—especially with tools like Git and RVM—can be frustrating. Repeating commands, lack of intelligent suggestions, and limited history all hamper productivity.
When I started exploring zsh, I quickly realized it wasn’t just a replacement. It’s a modern shell with a strong focus on usability and developer experience. It brings new capabilities that increase productivity and aligns well with how developers work in the terminal. The learning curve is small, especially for anyone already familiar with bash.
This wasn’t just about chasing trends. I decided to evaluate the benefits of zsh and the oh-my-zsh project point by point. What I found was a new standard of quality for my development environment. Just like we use powerful IDEs to increase productivity, we should treat the shell with the same care.
In this post, I revisit some fundamental shell concepts, explain why this change makes sense for those who live in the terminal, and present practical examples, useful commands, and suggestions you can apply right away without breaking your environment. Bash isn’t going anywhere, but zsh can easily become your new default.
Comparing Bash and ZSH
One of the clearest ways to understand the value of zsh is to compare it directly with bash. While many of these features already existed in 2011, they weren’t clearly documented or accessible to beginners. Zsh changed that with an engaged community and tools like oh-my-zsh.
Here’s a comparison of their core features:
| Feature | Bash | ZSH |
|---|---|---|
| Auto-complete | Basic | Advanced with preview & menu |
| History across sessions | No | Yes |
| Command correction | No | Yes |
| Globbing (wildcards) | Limited | Powerful and expressive |
| Alias and function support | Yes, limited | Yes, very flexible |
| Plugin and theme support | Manual | Built-in with oh-my-zsh |
What surprised me most was how easy it is to customize zsh. In bash, you had to edit .bashrc or .bash_profile, which often involved confusing syntax. With zsh, the configuration is centralized and more readable.
Another important advantage: visual customization. Themes like Robby Russell’s are not just aesthetic—they improve your workflow by showing contextual information like the current Git branch, which is critical when working with version control.
This goes beyond looks—it enhances feedback and reduces mistakes. I’ve made several pushes to the wrong branch simply because I didn’t realize where I was. With zsh, that risk drops considerably.
And even if you’ve been using bash for years, zsh is 100% compatible with your scripts. You can transition gradually and unlock its features over time.
Essential ZSH Features
Zsh’s feature set may seem overwhelming at first, but in practice, they compound into small, powerful gains. Below are some of the features that significantly changed my day-to-day workflow:
1. Command correction:
If you type gti instead of git, zsh prompts:
zsh: correct 'gti' to 'git' [nyae]?
2. Smart auto-completion:
It’s more than just TAB—it offers context-aware menus:
kill <TAB> # shows active processes and PIDs
3. Persistent history across sessions:
Command history is preserved across multiple terminal sessions, so you never lose your flow.
4. Advanced globbing:
Use expressive patterns like:
ls (IMG|VID)*2011*(jpg|png|mp4)
5. Alias functions:
Define custom functions with ease:
function deployapp { git pull && cap production deploy }
Any of these features alone would justify switching to zsh. But the real magic happens when you add oh-my-zsh.
Oh-my-zsh: Your Terminal, Reimagined
Oh-my-zsh is a community-driven framework created by Robby Russell to help users get the most out of zsh. It brings themes, plugins, and sensible defaults right out of the box. It’s like what Homebrew is for package management—essential.
With oh-my-zsh, you get:
- Over 100 plugins (git, rails, bundler, brew…)
- Nearly 80 themes
- Auto-updating scripts
- Modular architecture for customization
Example of a Git-aware prompt:
➜ project git:(main) ✗
That visual feedback avoids costly mistakes. The git plugin also offers shortcut aliases:
gst   # git status
gco   # git checkout
gp    # git push
You get all this without configuring each alias manually. Your productivity spikes instantly. For beginners, oh-my-zsh provides a gentle onboarding path.
And the best part: if anything goes wrong, just delete the ~/.oh-my-zsh folder and you’re back to bash—safe and simple.
Step-by-step Installation
Installation is fairly simple. Here’s the process I used successfully on macOS 10.6 Snow Leopard:
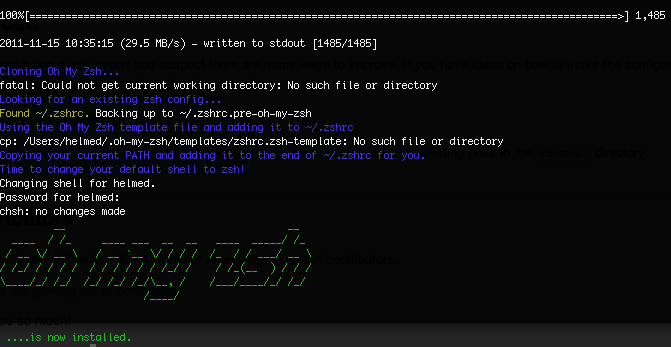
1. Install oh-my-zsh using the auto-installer:
wget --no-check-certificate https://github.com/robbyrussell/oh-my-zsh/raw/master/tools/install.sh -O - | sh
If you don’t have wget, use Homebrew:
brew install wget
2. Verify zsh installation:
zsh --version
3. Make it your default shell:
chsh -s /bin/zsh
4. Restart your terminal
You’ll see something like:
➜ ~
Once you get used to it, you won’t want to go back.
Tool Summary
Here’s a recap of the tools used:
| Tool | Main Purpose |
|---|---|
| ZSH | Modern, flexible, productive shell |
| Oh-my-zsh | Configuration framework for zsh |
| Homebrew | macOS package manager |
| Wget | CLI-based download utility |
| Git | Version control |
| RVM | Ruby version and gem manager |
This experience reminded me that it’s never too late to improve your development setup. The terminal is more than just a tool—it’s your second brain. Making it smarter and more enjoyable is an investment that pays off daily.
Now that you’ve seen what’s possible, take an hour, follow the steps, try the themes, explore the plugins. There’s no single best way—but there is a great place to start: zsh.